Monday, April 23, 2012

Mini Chicken Pot Pie's

Pin It

On a cold and windy day, what is your comfort food? My husband's is chicken pot pie! So the good wife that I am, I made it! Now I am a big fan of using my muffin pan for pretty much anything you can think of; whether that be mini meatloaf muffins, cookies, quiche, OR chicken pot pie. The muffin pan saves time cooking and makes it easy to throw a few muffins into a ziploc container and take for lunch the next day. If you've never tried this I highly suggest it.

Prep Time: 20    
Cook TIme: 12-15 min

Ingredients:

1 can cream of chicken soup
1 cup frozen mixed veggies
1 1/2 cups shredded cheddar cheese
1 TB Herbs de Provence
1 tsp garlic powder
2 can Pillsbury Grands biscuits
1-2 cups pre-cooked diced chicken (buy these in the frozen section of the grocery store)

* I used fat free chicken soup and low fat biscuits to make this a bit healthier

Preheat your oven to 400. 

Cook chicken according to package instructions, I eyeballed how much chicken I used. I used enough chicken to cover the plate, but not so much that it was overflowing or chicken on top of chicken.

In a large bowl, combine the cooked chicken, cream of chicken soup, frozen veggies, cheese, herbs and spices.

Pam spary a 12-cup muffin tin and place the Pillsbury biscuits into each cup, pressing into the bottom and up the sides. Depending on the can of biscuits you may have extra biscuits, I decided to make super mini chicken pot pie's with my extra. Cut the biscuits in fourths and press firmly into mini muffin pan.


Evenly spoon the pot pie mixture into each biscuit cup. Slide into the oven and bake for about 12 minutes. I was a little worried about pot pie overflow, you may want to put a cookie sheet underneath the muffin pan(s).

Let rest for a few minutes and then pop them out with a knife! voila your done and enjoy!

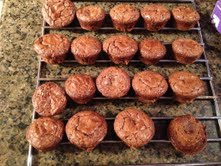
These are the mini one's, the overflowed a bit!
Pin It

Friday, April 20, 2012

Brownie Cookie's

Pin It
These are super easy to make and really good! Buy store bought cookie dough and brownie mix. Spray the muffin pan with Pam spray 1st. Then take the cookie dough and press firmly on the bottom of the muffin pan. Now the surprise part is whatever you want inside! I used a combination of Reese's peanut butter cups, Snickers peanut butter bites, and Milky Way caramel bites. I cut each according to how they would fit, some smaller then others. Then take the brownie batter you have mixed up and spoon over the now cookie-candy piece mixture. Do not over fill because the brownie mixture will spill over as it cooks.


Now I used a small mini muffin pan but you can use a regular muffin pan. Depends on what you have on hand, but whatever works!!!


Preheat oven to 350;   Bake for 18 minutes!  Let cool completely before taking out of pan, they will break apart if removed too soon. (learned this the hard way)


Pin It

Thursday, April 12, 2012

A Kitchenaid Mixer

Pin It Just a quick tip for all those cooks,bakers, etc out there- YOU NEED A KITCHENAID MIXER!

I received mine as a wedding gift and it literally changed my life. I have NEVER been a baker, for those that cook/bake you know that you are either really good at one or the other, not usually both. I was the cook-not the baker. UNTIL I got this mixer. It makes life so easy and it is a very worthwhile investment. So if you were on the fence about getting one, well jump off that fence and go buy one! Try Ebay, they are some pretty good ones that even if they are used they are still in good shape. These things are indestructible!! I LOVE mine!
Pin It

Chocolate PB Chip Cookies

Pin It
These are probably the best cookies ever!!! Seriously, they are the greatest cookies ever to have been made on the face of the planet in all of time. Now let me warn you, the recipe says to wait 24-36 hours before baking. Now I understand that this sucks cause who wants to make cookies and then not be able to eat them right away?! Now I have made them waiting and also not waiting....they are better if you wait BUT still are awesome by not waiting. To find out why they taste better click here, it's an article by the NY Times that explains why it's better to chill the dough overnight. For a very short version of why compare it to marinating meat. The meat needs time to soak up the marinade, its sorta like that with cookies.

Now the 1st two ingredients are gonna throw you, but I guarantee you that buying these two will be well worth you while!!


2 cups minus 2 tablespoons (8 1/2 ounces) cake
flour

1 2/3 cups (8 1/2 ounces) bread flour

1 1/4 teaspoons baking soda

1 1/2 teaspoons baking powder

1 1/2 teaspoons coarse salt

2 1/2 sticks (1 1/4 cups) unsalted butter

1 1/4 cups (10 ounces) light brown sugar

1 cup plus 2 tablespoons (8 ounces) granulated
sugar

2 large eggs

2 teaspoons vanilla extract

1 1/4 pounds chocolate chips (or choc & PB chips OR whatever the hell you want!!)

Combine flours, baking soda, baking powder and salt into a bowl and set aside. (I used a whisk to mix together)

Using a mixer with a paddle attachment, creambutter and sugars until light and fluffy – about 5 minutes. Add eggs. Stir in vanilla
Reduce to low speed and add dry ingredients slowly, mixing until just combined. Fold in chocolate chips. Refrigerate dough for 24-36 hours THEN bake at 325 for 10 minutes.
What I do to tide me over until I can bake them is just eat a bunch of cookie dough. It's addicting, it's like OH MY GOD I cannot STOP eating this dough. So they say it's bad for you, well hey I am 30 years old and have YET to get sick.  
BEST COOKIES EVER!!!
Pin It

Saturday, April 7, 2012

Easter means it's time to color EGGS!

Pin It
So my sister and I normally color our Easter eggs together at my parent's house every year, this year however she has moved to L.A. so I am on my own. :( Now perhaps this is just my family, but we LOVE when the little PAAS easter kit contains the coveted white crayon so that we can write secret phrases on the eggs that reveal themselves once they are colored. Normal people probably write Happy Easter or other such Easter like phrases; not my family. We tend to write that one dog loves the other more and for some reason we got into this habit of writing Mom is a ho bag. Yes I know you are all very shocked, who would ever write such a thing about one's own mother?! Well my mom was always there and found it humerous. Not sure how in the world it got started that we were writing that, but it happened every year and even though my sister, Ashley is not here with me to laugh and joke and write obscene funny phrases on the eggs I will try to keep the tradition going. Although she is surely missed.

Now it's  EGG COLORING TIME!!!!

Start with room temperature eggs.
Eggs that have been sitting on the kitchen counter for up to an hour are less prone to cracking when the cooking water rapidly heats up than ones that come straight from a cold fridge. The USDA says don't keep raw eggs out of the refrigerator for more than two hours.

3. Cook eggs in one layer in cold water.
Place eggs in one layer in a saucepan and cover by about two inches of cold water. Gently bring to a boil. This helps prevent cracking. Don't overcrowd. Eggs jostling each other can also lead to breakage. It's safer to cook a large number of eggs in a few batches.

4. Turn off burner and cover.
When the water comes to a full boil, turn off the heat and cover pan tightly.

5. Let eggs sit undisturbed for about 12 minutes.
They will slowly cook in the hot water yielding a tender white and sunny yellow yoke. Jumbo eggs will need 15 minutes. The beauty of this method is that it's difficult to overcook your eggs, so you can be flexible about the timing.

6. Gently remove eggs from water.
With a slotted spoon, carefully transfer boiled eggs to a large bowl of ice water.

7. For easy peeling, crack shell and submerge in water.
Gently roll a hardboiled egg on the countertop and place in a bowl of water for a few minutes before peeling. The water will seep in and loosen the shell.
Store hardboiled eggs in the fridge for up to a week.

Now it's time to color them!! I found this idea on Pinterest and it's awesome. Instead of using 12 different bowls for each egg color why not use a muffin pan?!
 Place each egg in the muffin slot and rotate after a few mintues until desired color is reached.
Once desired color is reached, place the finished eggs back in the egg carton!


Happy Easter Everyone!!!!
Pin It
Pin It